Pi-hole on Raspberry Pi using Docker and Docker Compose
I need to start this article with some simple disclaimers: I love Raspberry Pi, I love Docker, I don’t love networking that much (spoiler alert: I suck at it).
- I love Raspberry Pi because it is a tiny, fully functioning computer that gives me goosebumps. It is one of those things that makes you feel like Mr. Robot. It is relatively cheap, it is accessible, and there are tons of guides online to do pretty much anything you can imagine.
- I love Docker because it is a simple way of running various pieces of software in a standardized way: you pull the Docker image for your platform, you run the image with a single command and that’s it! You can glue things together, you can add your own images, you can share your configuration, you can run the same setup on different machines, and you can destroy things easily once you don’t need them anymore. I am not saying it is the simplest software ever, but it is relatively easy to play around with.
- I don’t love networking much, simply because I suck at it. I have a basic understanding of high-level concepts about many parts of it, but they don’t always translate to how things work in real life. I roughly know how computers communicate over a network, but I quickly get lost when I need to debug a bad connection for example. The good thing is that it means I’ll aim to keep this guide as simple as possible so that I can understand it as well.
So, since we are done with the disclaimers, let’s touch on the basics a bit before we get on with the guide. If you know all the tools and technologies mentioned above, feel free to skip that part.
Basics
Since we’ll need to get a bit technical in the article, there are a couple of things we need to clarify so that there will be less confusion moving forward. I’ll try to be brief here, and add some reading material in case you’d like to learn more.
What is Raspberry Pi?
Raspberry Pi is a simple, single-board computer that is originally developed for educational purposes; however, the board has become widely popular among makers and has been very popular for many use-cases including robotics, home automation, and IoT. The first one being launched in February 2012, the Raspberry Pi has 4 generations as of today, the latest one being the most advanced one including a Quad-core ARM processor and up to 8GB RAM. The latest version of it starts from $35 and goes up to $75; not super cheap, but a good price for a general-purpose computer.
Think of Raspberry Pi as a simple desktop computer without any screens or peripherals attached. You can connect screens to it, you can connect your keyboard, mouse, ethernet, and use it as a regular computer. There are tons of use-cases that don’t need these peripheral devices, therefore it is common to see Raspberry Pi devices being used inside handheld devices, or hidden in an office space as a network device, or whatever. It is a general-purpose computer, and your imagination is the limit here.
The device looks like this:
](/blog/assets/images/pihole-docker/raspberry-pi.png)
They also have an even-cheaper and smaller version of the same family, Raspberry Pi Zero W, which has fewer resources than the regular Pi, but it is even smaller than the regular ones, making it suitable for IoT applications and mobile use-cases. The current selling price for the Zero W is $10.
](/blog/assets/images/pihole-docker/raspberry-pi-zero.jpg)
All the Raspberry Pi devices are capable of running various operating systems (OS) depending on the specific model you have; however, the most common operating system for Raspberry Pi is Raspberry Pi OS, Raspbian with its old name. It is based on Debian, has a bunch of simple installers, and it is a good starting point for tinkering with the Pi. I strongly recommend going with the Pi OS if you are just getting started with the ecosystem, it’ll definitely simplify your journey in the beginning in terms of finding documentation and help online.
For learning more about the Raspberry Pi, head over to the official Raspberry Pi website.
What is Pi-hole?
Pi-hole is a plug-and-play software that offers network-wide DNS sinkhole for filtering out content for all the devices connected to the same network. In simple terms: when your browser tries to connect a server to show you some content on a website, Pi-hole will resolve the IP address for that host into a blackhole IP address if it is on a blocklist, meaning that your computer will not reach the ad server, and as a result, you won’t see ads. This has a bunch of benefits for the end-user:
- There is no need to install specific software to any of the devices connected to the network, and all of your devices can benefit from this, including your smart TV and mobile devices.
- This allows blocking not only the traditional ads on websites but also the in-app ads that are embedded in other places, such as the operating system of your smart TV.
- Since the request for the ad content will never leave your network, nothing will be downloaded, and your network performance will improve.
- It also blocks some trackers, which means it automatically provides better privacy while you are surfing.
All in all, Pi-hole is a neat piece of open-source software that gives you better visibility and control into the ad traffic that is happening in your network. For more details, go ahead and visit their website, as well as their GitHub organization for checking the source code and learning more about the project.
What is Docker?
The poster-child for the cloud-native era, Docker has been a very popular software in the last couple of years. It is essentially a nicely packaged system that simplifies managing containers on many different operating systems, and it is the de-facto standard engine for running containers. It allows you to package your application and its dependencies in a simple format and share them. You can head over to the following link to learn more about Docker (spoiler alert: I wrote the article): What Exactly is Docker?
Goals
So, I wanted to set up Pi-hole on my home network, and I had a Raspberry Pi 3 Model B+ lying around. I had a couple of goals before I started the setup:
- I wanted to be able to manage the device remotely; meaning that all I need to change things there should be a working network connection to the device, and since I’ll start with my home network, that’ll be a given anyway. I don’t want to depend on keyboards, screens, or other peripherals to be able to play with it.
- I wanted to utilize the same Pi for my other use-cases such as home automation; therefore, I wanted to keep the Pi installation as clean as possible, in case I’d need to rebuild the same setup using a different device, or if I need to do a clean install on another storage device.
- I wanted to be able to keep my setup in a Git repo in order to be able to keep track of my changes and have a backup, because, why not?
- I wanted the setup to be easy to reproduce in other devices and networks so that I can set it up for my family and friends as well.
- I wanted to be able to extend my setup with other use-cases, hopefully with some sort of automation to deploy my changes to the Pi. I can always connect to the Pi and install whatever I need manually, but this would contradict my previous goal to make the setup easy to reproduce.
For some of you, these goals might be irrelevant, and that’s totally fine. I just wanted to aim for these and learn to try to achieve them.
In the end, I decided to go for a simple Pi OS Lite setup with Docker & Docker Compose to manage Pi. The reason I picked the Lite OS is that I didn’t need a desktop environment and the other software that comes with the default Raspberry Pi OS, such as games or office software. The reason I decided on Docker is that I wanted to be able to run everything as containers on the device to not to depend on manual installation and the dependency hell, and Docker Compose is to be able to define all the things I’ll run in a simple YAML format that I can keep in the version control. In addition, relying on Docker from the beginning enables me for future adventures in case I want to go there, such as building clusters or running Kubernetes on Raspberry Pis. Of course, these are not requirements, just potential ideas for my amusement.
As I have mentioned before, this doesn’t mean that you have to run this very same setup for your installation; it just happened to be the one I chose. The rest of the article will be about getting this configuration up and running, so, follow along if you are still interested.
Requirements
Our requirements for the project is relatively simple:
- A primary computer to manage the whole installation in your network.
- A working internet connection.
- A router with ethernet ports. You can also use the built-in Wi-Fi some models have, although it will perform better if you use a cable connection.
- A Raspberry Pi, I’d imagine any model would do the job here.
- A MicroSD card for installing the operating system. If you already have an installed one, that’s also fine, it shouldn’t matter much which OS you have.
The rest of the article will assume that you meet these requirements on your part.
The steps we’ll take are:
- Setup the SD-card for booting the device
- Connect the Pi to your router, and access the internet
- Install Docker
- Run Pi-hole using Docker & Docker Compose
- Replace your router’s DHCP server with the Pi-hole DHCP server
- That’s it!
Let’s get started.
Before you go on
One thing to keep in mind is: Pi-hole cannot remove all the ads from all the websites. Blocking ads is simply a cat-mouse game, and Pi-hole is trying to disable them on the DNS level, meaning that you should still keep your blocker extensions on your browser for a good experience. Pi-hole will definitely contribute to your overall experience but do not get pissed off if it doesn’t remove all the ads, some ads are practically impossible to get rid of without significant effort.
If you are looking for a blocker extension, I recommend the open-source uBlock Origin: here’s for Google Chrome and here’s for Mozilla Firefox.
Step 1. Setup the SD-card
You can skip this section if you already have a Raspberry Pi that has SSH enabled somehow. Stay here if you’d like to start by installing the Raspberry Pi OS on an SD-card from scratch.
Our Raspberry Pi needs an operating system to function, to begin with. If you don’t have much of an idea about which operating system to pick, or if you don’t have a preference, you are probably better off with the official operating system of the Raspberry Pi, which is Raspberry Pi OS. This operating system is officially supported by the Raspberry Pi Foundation and would be the simplest default to get started with in terms of online support.
](/blog/assets/images/pihole-docker/pi-os.jpg)
For my specific use-case, I’ll be using the Raspberry Pi OS Lite version, which is the same operating system without the desktop graphical user interface (GUI). I don’t need a GUI because I will not connect my Pi to a monitor or anything, and I won’t be using it as my primary computer; therefore, I don’t need a user interface. This also has the additional benefits of less software included with the operating system and a much smaller OS size, 435MB for the Lite version vs 1133MB for the desktop version for the August 2020** **version.
Writing the base image
The easiest way to write an OS image to an SD card is the Raspberry Pi Imager tool, which is a simple tool that works on all major operating systems and allows creating an SD card with one of the included images.
Once you plug your SD card into your computer, you can simply click the “Choose OS” button and pick the Lite version in the popup window under the path “Raspberry Pi OS (other) > Raspberry Pi OS Lite (32-bit)”. After that, you can click the “Choose SD Card” button and pick your SD card from the list. Once you are done, simply click on the “Write” button and wait until the process completes.
Once you are done with this, do not unplug your SD card from your computer, because there is one last step before our OS setup is ready.
Enabling SSH
In order to be able to reach our Raspberry Pi from our primary computer, we need to have SSH access to the Pi. By default, Raspberry Pi OS disables the SSH access for security reasons; therefore, we need to enable it. Be careful: we are enabling SSH access because we are going to be using our Raspberry only in our internal network; if you are thinking of setting this up for your office space or a public network, you need to think about securing the SSH connection, especially getting rid of the password and using public-private key authentication.
Enabling the SSH connection is very simple: open your SD card contents on your computer, and create a new file called ssh there. The file doesn’t need to have anything written into it, and make sure there is no extension in the file name, like .txt or anything: just name it as ssh. The first time the OS boots, it’ll check the existence of this file, and enable SSH access on your Raspberry.
Once this is done, your operating system is ready to be used.
Step 2. Add Raspberry Pi to your network
In order to be able to reach your Pi from your primary computer, the Pi needs to be in the same network as your computer: simply put, just plug an ethernet cable between your router and the Raspberry Pi. After this, you can simply plug your Raspberry Pi into your power adapter, and let it boot. Raspberry is usually quick to boot, but give it a few minutes just to make sure it booted.
At this point, you should be ready to connect to your Raspberry via SSH. Go to your primary computer’s terminal and type:
In case you are prompted with a password for this connection, the default password is raspberry.
If you are on a Windows machine, it might not be that simple to run SSH through the default Windows terminal, so I suggest using PuTTY for this use-case. The ways to connect your Raspberry Pi through SSH for different operating systems are also covered in the official docs, so make sure to go through them if you are unable to SSH into your Pi. This is also the point where you should figure out what terminal setup to use on your primary computer because the rest of the guide will assume that you are able to run commands like docker ps on your primary computer’s terminal. I am using macOS, but the process should be similar in any other common terminal.
Once you are successfully connected, you should see something like the following:
Linux raspberrypi 5.4.51-v7+ #1333 SMP Mon Aug 10 16:45:19 BST 2020 armv7l

The programs included with the Debian GNU/Linux system are free software;
the exact distribution terms for each program are described in the
individual files in /usr/share/doc/*/copyright.

Debian GNU/Linux comes with ABSOLUTELY NO WARRANTY, to the extent
permitted by applicable law.
Last login: Mon Oct 26 00:59:18 2020 from 1.2.3.4
pi@raspberrypi:~ $
If you see the pi@raspberrypi:~ $ prompt, it means you are connected already, which is great news.
Changing the default SSH password
By default, SSH access is enabled for the user pi with the password raspberry, which is not a very safe default to keep on, therefore let’s go ahead and change the password.
To change the password, simply type passwd and hit the Enter key. This should show you a simple form to change your password. Make sure to set a strong password.
Set a static IP on your Raspberry Pi
IP addresses will constantly change in any network, and for the rest of our guide and the Pi-hole use-case, it is important to have a static IP set for our Raspberry Pi so that even if it disconnects, the IP address won’t change. TO do that, we need to run a couple of simple commands, gather the outputs, and write them to another file in the end.
Let’s start with the router IP:
ip r | grep default
The output will look like this:
default via 192.168.0.1 dev eth0 src 192.168.0.2 metric 202
The first IP address, 192.168.0.1 in my case, is the IP address of our router. Take note of this value, you’ll need it later.
Next, run the following command to get your current private IP:
ifconfig -a | grep -A 1 eth0 | grep inet
This will output something like this:
inet 192.168.0.2 netmask 255.255.255.0 broadcast 192.168.0.255
The IP address right next to the inet one, 192.168.0.2 in my case, is your private IP. Take a note of this value too.
Now the last step, run the following command:
sudo nano /etc/dhcpcd.conf
This will open up the editor for the configuration file, scroll to the bottom of the file and add the following lines:
interface eth0
static ip_address=<YOUR_PRIVATE_IP_ADDRESS_HERE>
static routers=<YOUR_ROUTER_IP_HERE>
In my case, these lines look as follows:
interface eth0
static ip_address=192.168.0.2
static routers=192.168.0.1
That’s it, you did it! At this point, you need to reboot your Raspberry Pi with a sudo reboot command for the changes to take effect; however, the following section will also require you to do that as well, so if you are gonna follow along with the guide, then you can keep going and restart later when Docker installation requires it.
Step 3. Install Docker
Before we even install Docker on the Raspberry Pi, you need to make sure that you have Docker installed in your primary machine, so that we can run the Docker CLI commands from our terminal with the Raspberry as the remote Docker host, meaning that we don’t need to copy files over and stay connected to the Raspberry to modify our containers there. Docker is available for all the major operating systems, please install it for your primary computer if you haven’t already.
In order to install Docker on your Raspberry Pi, start with connecting via SSH if you haven’t already:
Once you are in, let’s start by updating our packages:
apt-get update && apt-get upgrade
After your upgrade has finished, run the following command:
curl -sSL https://get.docker.com | sh
Well, in general, it is not a good practice to pipe curl output to sh directly, since this opens up basically a pool of endless remote code execution possibilities, and you should think about why this should be avoided. At the same time, I couldn’t find a safer way of installing Docker on Raspberry Pi OS which is also easy for beginners, so I decided to settle with this option. If you have a suggestion to improve this from the security perspective, please drop some comments and I’ll include them here.
After Docker is installed, you’ll need to add the pi user to the required group to be able to run docker commands:
sudo usermod -aG docker pi
At this point, you need to reboot your device for this to take effect:
sudo reboot
This will kill your current SSH connection since the device starts the reboot. Give it a few minutes to boot and connect it again:
At this point, you should be able to validate your Docker installation with a simple command:
pi@raspberrypi:~ $ docker run hello-world

Hello from Docker!
This message shows that your installation appears to be working correctly.

To generate this message, Docker took the following steps:
 1. The Docker client contacted the Docker daemon.
 2. The Docker daemon pulled the "hello-world" image from the Docker Hub.
    (arm32v7)
 3. The Docker daemon created a new container from that image which runs the
    executable that produces the output you are currently reading.
 4. The Docker daemon streamed that output to the Docker client, which sent it
    to your terminal.

To try something more ambitious, you can run an Ubuntu container with:
 $ docker run -it ubuntu bash

Share images, automate workflows, and more with a free Docker ID:
 [https://hub.docker.com/](https://hub.docker.com/)

For more examples and ideas, visit:
 [https://docs.docker.com/get-started/](https://docs.docker.com/get-started/)
If you get this output, it means that your Docker setup is completed, yay!
Step 4. Run Pi-hole
Now is the time for the real stuff: running the Pi-hole. Docker allows us to control a remote Docker machine by running our regular Docker commands with a special env variable called DOCKER_HOST. So, let’s start by defining this environment variable first.
export DOCKER_HOST=ssh://[email protected]
From this point on, all the Docker commands we run will be against the Raspberry Pi’s Docker environment. Alternatively, you can prefix this environment variable to the commands you’ll run to run them against Pi explicitly, like this:
DOCKER_HOST=ssh://[email protected] docker ps
This will list the running containers on your Raspberry Pi.
Docker Compose
We wanted to be able to define our containers declaratively and store them in version control, therefore we’ll use Docker Compose. Create a directory for your project, then create a file called docker-compose.yml. Put the following content into this file:
version: "3.8"

services:
  pihole:
    container_name: pihole
    image: pihole/pihole:v5.1.2
    restart: always

    environment:
      TZ: 'Europe/Berlin' # Put your own timezone here.
      WEBPASSWORD: 'replacethispasswordplease' # Put a strong password here.

    # We'll use host networking simply because it is way easier to setup.
    network_mode: host

    # Volumes store your data between container upgrades
    volumes:
      - './etc-pihole/:/etc/pihole/'
      - './etc-dnsmasq.d/:/etc/dnsmasq.d/'

    # Required for the DHCP server
    cap_add:
      - NET_ADMIN
That’s all actually. Once you have this file, all you have to do is:
DOCKER_HOST=ssh://[email protected] docker-compose up -d
This will start Pi-hole on your Raspberry Pi. Give it a few minutes, and afterward, you can go to the local IP address of your Raspberry Pi, 192.168.0.2 in my case, on your browser and see the Pi-hole UI.
Step 5. Make Pi-hole your primary DHCP Server
This step is optional if you can configure your router to use another device as the DNS server. In my case, my router did not allow me to change the DNS server, therefore I had to take the high road and use Pi-hole as the DHCP server in my network. Both options are documented here, so I’ll focus on the DHCP part mainly.
What is DHCP?
Dynamic Host Configuration Protocol (DHCP) is the communication protocol that allows every device in a network to have a dynamic local IP address so that the device can be addressed within that local network, and the software that manages this assignment process is called DHCP server. Simply, it is the thing that gives your computer the local 192.168.x.y IP address.
One thing you need to know before you move forward, especially if you don’t know what DHCP is or how it works: there needs to be a single DHCP server in a simple home network, otherwise you’ll set for trouble.
Before you go on
It is important to enable Pi-hole DHCP server and disable your router’s DHCP server subsequently to not to have two DHCP servers running in the same network, which would confuse the connected clients. Therefore, before you move on, make sure to find out how to disable your router’s DHCP server. This will highly depend on your router model, therefore you’ll need to google it.
Enabling Pi-hole DHCP server
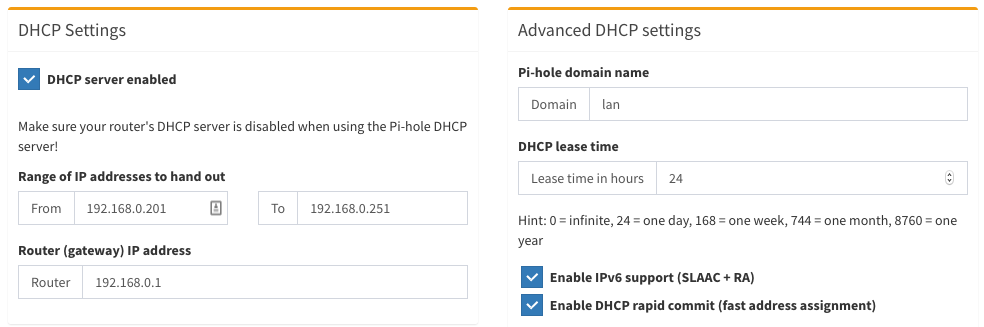
Pi-hole comes with a built-in DHCP server that can be used to replace your default DHCP server. To do that, go to Settings > DHCP and check the DHCP Server Enabled checkbox. Be careful about the range and IP address values there:
-
Range of IP addresses to hand out: This one is the IP range your devices will get locally. Give this a range between 50–250 as the last part of your IP address to have a safe range. In my case, I limited it to
192.168.0.201to192.168.0.251, meaning that any new device that joins my network will get an IP within this range. In my case, I can only connect 50 clients safely, which is enough for my use-case, but you might want to change this for your own setup. -
Router (gateway) IP address: This is the IP address of your router which we have found previously.
-
DHCP lease time: This is the time that a single local IP address will be allocated for a given client. It makes sense to give a low value to this limit during your setup so that you can test expired lease scenarios easily. Once you are done, you can increase this value to a week or so, which would be beneficial if you have stationary devices in your home network.
-
Enable IPv6 support (SLAAC + RA): This one is for distributing IPv6 addresses in your home network. I want this to be taken care of by Pi-hole as well, so go ahead and check this too.
-
Enable DHCP rapid commit (fast address assignment): This is an option to use DHCP rapid commit. It basically allows faster address assignment on trusted networks like your home. In my case, my router didn’t allow me to disable the IPv6 DHCP server, therefore I enabled this feature so that the clients canget an IP address from the Pi instead of my router, allowing using no-ads surfing on all my devices.
Once you are done, hit the “Save” button at the bottom of the page and move onto the next step.
Disabling router’s DHCP server
This highly depends on your router configuration, but you should have figured out how to disable your router’s DHCP server at this point anyway. So, go ahead and disable it.
That’s it!
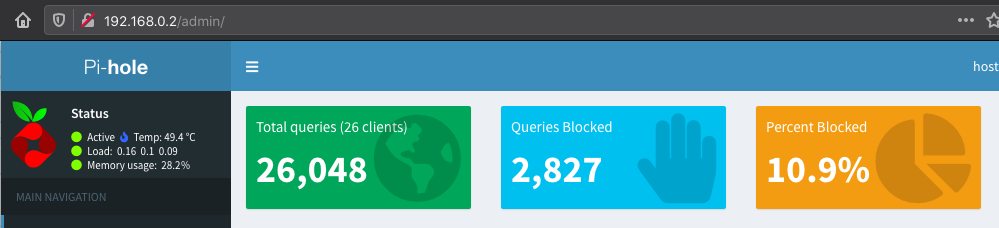
At this point, you should be ready to surf the internet with Pi-hole enabled. To enjoy the benefits of Pi-hole quickly, you can reboot your devices and let them join the network again. Once they reconnect, Pi-hole should be the acting DHCP server and you should start seeing the number of queries increasing on your Pi-hole dashboard.
Keep in mind: there are many layers of DNS caching involved in network communication, therefore give your devices some time, a day or two maybe in some cases, until you start complaining that you are still seeing ads. Alternatively, you can clear the DNS cache of your devices, although it might still be the case that there’ll be some cache that shows you some ads. Give Pi-hole some trust and let your devices adapt as the time goes by renewing their DNS caches. I have been using this setup with no issues for ~2 weeks now. I have done some further research and added some more lists to my blocklists to improve my privacy, and Pi-hole is blocking somewhere between 10–15% of my network traffic on an average day.
One thing to note here is that: there might be some cases where Pi-hole blocks a domain you actually want to visit, therefore you want to put some exception rules in your blocking strategy. To do that, you can simply go to the Query Log tab on your Pi-hole dashboard and see the blocked domain:

Once you get the domain, you can go to the Whitelist tab on the sidebar and add this domain to your whitelist so that Pi-hole doesn’t block this address.
I hope you enjoyed this piece and learned a thing or two. Feel free to suggest improvements or correct my mistakes in the comments below. I’d also like to thank my friend Burak Sayin for his patience and help debugging my Pi-hole setup at home as well as for his review on the article.
Here’s a cute dog for a nice rest of the day for you: